Ubuntu服务器端部署大模型
Ubuntu服务器端部署大模型
调用Ollama
下载
1 | curl -fsSL https://ollama.com/install.sh | sh |
docker方式
1 | docker run -d --gpus=all -v ~/ollama:/root/.ollama -p 11434:11434 --name ollama ollama/ollama |
1 | docker run -d -v ~/ollama:/root/.ollama -p 11434:11434 --name ollama ollama/ollama |
开启ollama服务端
好像也不需要?可能是用于在后台运行的
1 | ollama serve |
下载模型
1 | ollama run llama2-chinese:latest |
docker方式
1 | docker exec -it ollama ollama run llama2-chinese |
运行大模型WebUI
文档:🚀 Getting Started | Open WebUI
此处使用开源项目openwebui
1 | docker run -d --gpus=all -d -p 3000:8080 -e HF_ENDPOINT=https://hf-mirror.com/ -e OLLAMA_BASE_URL=http://10.248.68.50:11434 -v ~/open-webui:/app/backend/data --name open-webui --restart always ghcr.io/open-webui/open-webui:main |
1 | docker run -d -p 3000:8080 --add-host=host.docker.internal:host-gateway -v open-webui:/app/backend/data --name open-webui --restart always ghcr.io/open-webui/open-webui:main |
BUG
- huggingface.co 的连接问题
去docker logs -f open-webui获取到错误日志,虽然日志超级无敌长,但是关键词是hugging face
截取部分日志
1 | urllib3.exceptions.MaxRetryError: HTTPSConnectionPool(host='huggingface.co', port=443): Max retries exceeded with url: /sentence-transformers/all-MiniLM-L6-v2/resolve/main/config.json (Caused by ConnectTimeoutError(<urllib3.connection.HTTPSConnection object at 0x7fd5bc4d0510>, 'Connection to huggingface.co timed out. (connect timeout=10)')) |
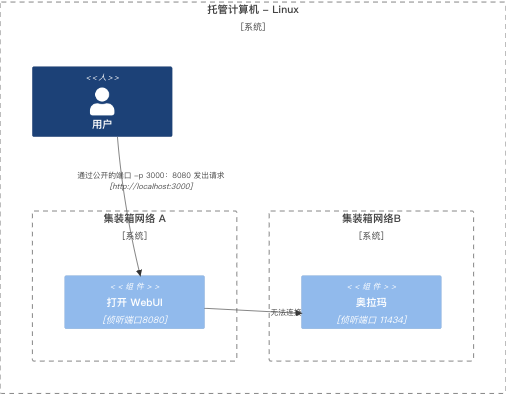
docker内部的网络隔离问题
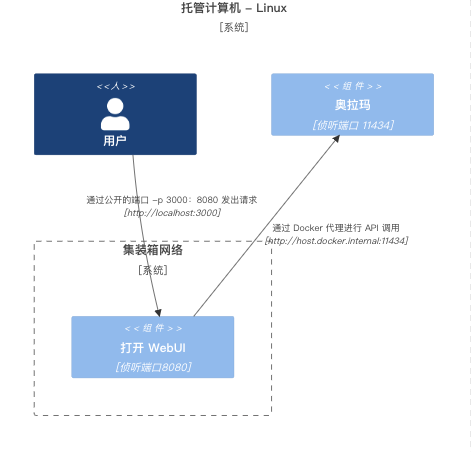
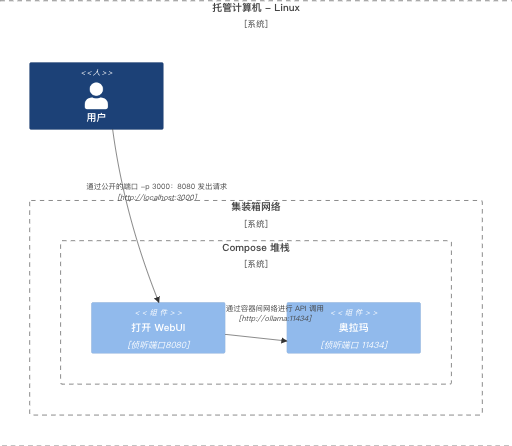
ollama也是通过docker进行部署的,如果这样的情况下,两个不同的Container中是无法通过--add-host=host.docker.internal:host-gateway命令进行连接的,需要通过IP+地址的方式进行访问或者将其放置到Compose中形成一个内部网络Linux - Ollama 和 Open WebUI 在容器中,在不同的网络中

Linux - 主机本地上的Ollama,在容器中打开WebUI
Linux - Ollama 和 Open WebUI 在同一个 Compose 堆栈中
通过服务器返回数据
返回格式参考:API 参考 - Ollama中文网
默认启动后就会启动API的服务
http://127.0.0.1:11434/api/generate
微调模型
使用LLaMA-Factory进行微调
1 | ``` |
然后运行下面的命令
1 | ollama create nftchat -f ./causallm7bq5.mf |
API调用
ChatGLM3/openai_api_demo/api_server.py
1 | python api_server.py |
LLaMA-Factory/src/api.py
1 | CUDA_VISIBLE_DEVICES=0 API_PORT=8000 python src/api.py \ |
vLLM
1 | python -m vllm.entrypoints.openai.api_server \ |
Ubuntu服务器端部署Stable Diffusion
安装
1 | git clone https://github.com/AUTOMATIC1111/stable-diffusion-webui.git |
docker安装
注意需要最新版本的compose
以Ubuntu 22.04为例,采用AbdBarho维护的docker-compose,仅支持Nvidia显卡。
- 拷贝AbdBarho的保存库
1 | git clone https://github.com/AbdBarho/stable-diffusion-webui-docker.git |
- 安装依赖套件,过程中会自动下载一个Stable Diffusion的模型。
1 | docker compose --profile download up --build |
- 启动容器,选取auto代表启动AUTOMATIC1111开发的WebUI
1 | docker compose --profile auto up --build |
启动
这里注意webui.py的位置,下面的命令,会根据系统配置,默认配置好项目环境,并安装好项目依赖包
1 | ./webui.sh |
注意需要先使用命令
1 | export http_proxy="http://127.0.0.1:7890" |
下面同时配置了外网通过IP访问,以及API访问
1 | ./webui.sh --listen --api |
上面的这些命令可以直接在webui-user.sh中进行集成
在COMMANDLINE_ARGS中指定需要的命令,之后直接执行./webui.sh就可以携带上这些命令
1 |
|
启动报错
1 | Cannot locate TCMalloc (improves CPU memory usage) |
解决:安装 libgoogle-perftools4 和 libtcmalloc-minimal4 库。这两个库是 Google 开源的性能分析工具库,可以帮助开发者优化程序性能。
1 | sudo apt-get install libgoogle-perftools4 libtcmalloc-minimal4 -y |
访问
进入下面的地址
1 | http://localhost:7860 |
API访问则使用下面的地址
1 | curl -X POST http://localhost:7860/sdapi/v1/txt2img -H "Content-Type: application/json" -d '{ |
添加扩展
安装中文和双语界面
- 正体中文扩充功能来源:benlisquare/stable-diffusion-webui-localization-zh_TW
- 简体中文扩充功能来源:dtlnor/stable-diffusion-webui-localization-zh_CN
Stable Diffusion WebUI可以通过扩充功能将界面变成中文。如果您想协助翻译,请点击以上的Github保存库链接,帮帮他们。
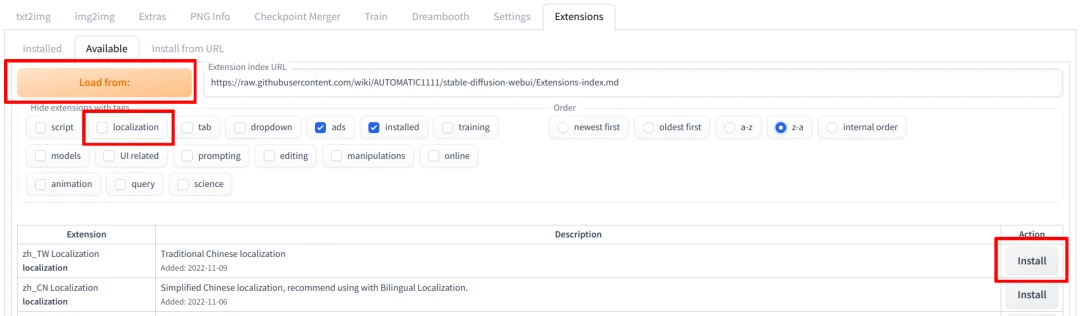
- 进入Extensions页面,取消勾选
localization,再点击Load from:,找到zh_TW Localization或zh_CN Localization,点击Install。
- 到Settings页面,找到左边的Localization,点击
zh-tw或zh-cn,再点击Apply Settings。
- 之后重启WebUI,界面就会变成中文了。
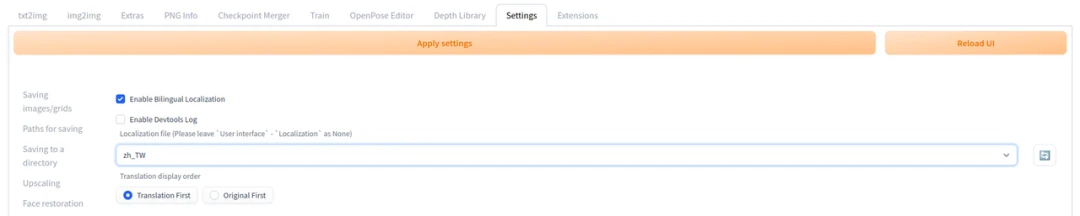
由于SD WebUI的扩充功能发展太快,翻译可能跟不上,建议另外安装双语对照sd-webui-bilingual-localization,同时显示中文和英文的文本,这样看教学时就不会找无按钮了。
双语扩充功能安装方法:在Extensions页面按Install from URL,填入https://github.com/journey-ad/sd-webui-bilingual-localization,再按Install。
在激活双语扩充功能前,要到Settings → User interface → Localization设为None
接着到Bilingual Localization中去把这里面的Localization修改为zh_CN,再重启WebUI才会生效。
BUG
报错如下:
1 | AssertionError: extension access disabled because of command line flags |
原因是开启了--listen的命令,官方出于安全考虑,在外网访问时是不能安装任何扩展的,所以需要加上--enable-insecure-extension-access的命令,用于绕开这个安全选项
大模型(基座模型,底模)添加
可以进入https://civitai.com/的Models部分进行下载,后缀为ckpt,为Checkpoint的缩写
模型权重下载好后,需要将模型放到对应的文件夹中,这里最常用的是:大模型 和 微调的LoRA 模型,分别放在 models/stable-diffusion 和 models/Lora下,启动后,WebUI 会自动从这几个文件夹中找到对应的模型
类梵高:
1、Van Gogh Diffusion:Van Gogh Diffusion - V1 | Stable Diffusion Checkpoint | Civitai
2、Van Gogh Style(Lora):奇维泰 |共享您的模型 (civitai.com)
水墨风:
1、国画山水和水墨山水Chinese Landscape Art:国画山水和水墨山水Chinese Landscape Art - v1.0 | Stable Diffusion Checkpoint | Civitai
像素风:
1、PixelStyleCKPT/像素画:PixelStyleCKPT/像素画 - Strength:0.7 | Stable Diffusion Checkpoint | Civitai
2、像素人:Application error: a client-side exception has occurred (civitai.com)
3、Pixel Art XL:Pixel Art XL - v1.1 | Stable Diffusion LoRA | Civitai
莫奈风:
下面为lora模型,lora还不知道怎么使用
1、Claude Monet/Oscar-Claude Monet style:Claude Monet/Oscar-Claude Monet style - v2.0 | Stable Diffusion LoRA | Civitai
赛伯朋克风:
1、赛博世界/Cyberworld/赛博朋克场景 Lora:赛博世界/Cyberworld/赛博朋克场景 Lora - v1.0 | Stable Diffusion LoRA | Civitai
科幻风:
1、XSArchi_127新科幻Neo Sci-Fi:XSArchi_127新科幻Neo Sci-Fi - v1.0 | Stable Diffusion LoRA | Civitai
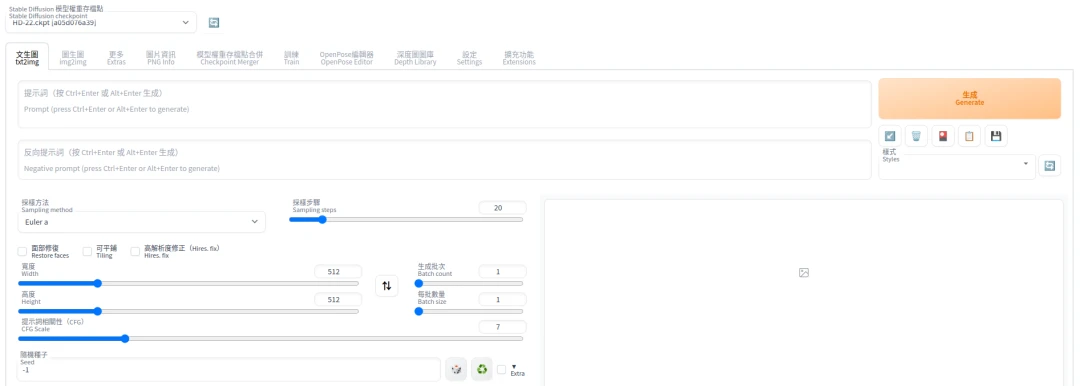
文生图API参数调整
参数含义:
在Stable Diffusion Web UI中,使用API时可以传递各种参数来控制图像生成的过程。以下是一些常见的API参数及其说明:
参考:全网最全stable diffusion webui API调用示例,包含controlneth和segment anything的API(附json示例)-CSDN博客
1 |
|
通用参数
这些参数适用于大多数API端点,例如/sdapi/v1/txt2img和/sdapi/v1/img2img。
prompt(str): 文本提示,用于描述要生成的图像内容。例如:”a futuristic cityscape”。steps(int): 采样步骤数。值越高,图像质量越好,但生成时间也越长。常用值在20-50之间。sampler_index(int): 采样方法索引,默认为0。可以使用不同的采样方法(例如DDIM、PLMS)。cfg_scale(float): Classifier-Free Guidance (CFG) 比例,控制生成图像与提示的相关性。值越高,图像越接近提示内容。常用值在7-15之间。seed(int): 随机种子,用于控制生成图像的随机性。相同的种子和参数会生成相同的图像。height(int): 生成图像的高度,默认值通常是512。width(int): 生成图像的宽度,默认值通常是512。batch_size(int): 一次生成的图像数量。n_iter(int): 生成图像的迭代次数。一次请求中生成的图像总数等于batch_size * n_iter。negative_prompt(str): 负面提示,用于描述不希望在图像中出现的内容。eta(float): DDIM采样中的eta参数,控制随机性。ckpt:在API请求中,通过指定ckpt或model参数来选择要使用的模型
特定参数
这些参数适用于特定的API端点,例如/sdapi/v1/img2img。
init_images(list of str): 输入图像的Base64编码列表,用于img2img任务。denoising_strength(float): 降噪强度,用于img2img任务。值越高,生成图像与输入图像的差异越大。常用值在0.2-0.8之间。mask(str): 掩码图像的Base64编码,用于指定图像的哪些部分需要重绘。inpainting_fill(int): 修补时使用的填充方式。
完整示例
以下是一个使用/sdapi/v1/txt2img端点的完整示例,展示了常用参数的用法:
1 | import requests |
API端点
/sdapi/v1/txt2img: 基于文本提示生成图像。/sdapi/v1/img2img: 基于输入图像和文本提示生成新图像。/sdapi/v1/extra: 执行额外的图像处理任务。
参数说明总结
prompt: 输入的文本描述。steps: 采样步骤数。sampler_index: 采样方法索引。cfg_scale: Classifier-Free Guidance比例。seed: 随机种子。height: 图像高度。width: 图像宽度。batch_size: 批量生成数量。n_iter: 生成迭代次数。negative_prompt: 负面提示。eta: DDIM采样中的eta参数。init_images: 输入图像列表(用于img2img)。denoising_strength: 降噪强度(用于img2img)。mask: 掩码图像。inpainting_fill: 修补填充方式。
通过这些参数,你可以高度自定义图像生成过程,满足各种应用需求。如果你有任何其他问题或需要更详细的说明,请随时告诉我。
例子
仿梵高的向日葵
1 | { |
仿莫奈的睡莲
1 | { |
BUG
访问后出现下面的返回
1 | { |
参考解决:[错误]:我没有 /sdapi/v1/txt2img 在稳定扩散中填充 ·问题 #13279 ·AUTOMATIC1111/stable-diffusion-webui (github.com)
这是端口问题导致的BUG,glm把7860端口占了,所以只能使用7861端口,以后要是无法启动,注意观察终端端口输出
获取图片进度API
目前猜测实现方式是,在进行文生图API后,马上调用http://127.0.0.1:7860/sdapi/v1/progress?skip_current_image=false
这个API,每秒访问一次,不过这个参数skip_current_image含义,还得到时候再试试
Ubuntu服务器端配置外网访问
使用clash进行配置,由于官方的项目已经跑路,这里选择的项目为:
详细可见和xyc的聊天记录,哪天自己也再去配置一下